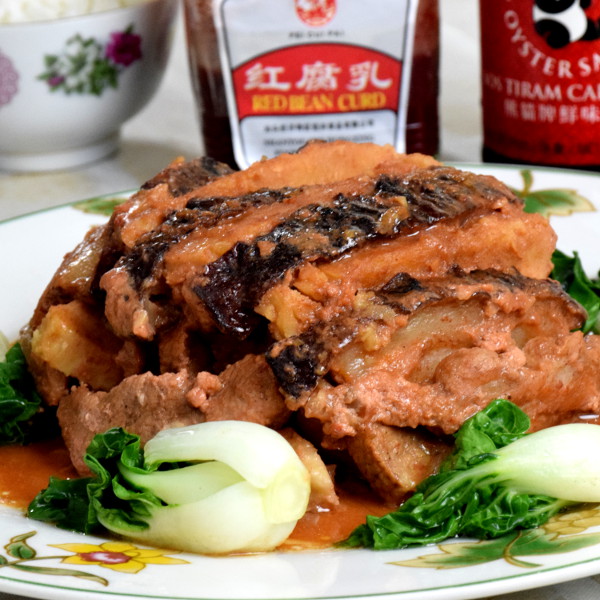
This Chinese braised pork belly with taro is an exceptional dish. Why?
Because the pork belly is served up-ended,
The pork and taro are cooked in a braising liquid in a deep bowl and inverted on a plate to serve. This action is called 扣 (means turn upside down, pronounced as ‘kao’), and meat is called 肉 (pronounce as ‘yuk’). Hence, by combining these two Chinese characters, we get “扣肉” means to “invert the pork onto a plate to serve up-ended”. This braised pork has an intense flavor and therefore is best to eat with some Asian leafy greens such as bok choy or lettuce.
Hence if you said ‘kao yuk’ to the Chinese they would immediately understand you are referring to this unique braised pork dish,
Braised pork belly with taro (some recipes call it as stewed pork with yam, it means that same thing) is a favorite home-cooked dish among the Hakka clan. They are famous for making meals with stewing or braising method. My wife is a Hakka, and so I am very familiar with this recipe.
This is an easy pork belly recipe, but you must have the patience to let it braised for two hours. Therefore it is best to make it during the weekend or when you are free.
Before you print out the recipe, please read the notes below which contain all the information you need.
Note: This post may contain affiliate links. Please read my disclosure for more info. I may receive commissions for purchases made through links in this post.


How to make Hakka style braised pork belly with taro in 4 simple steps
Step one- Prepare the pork for braising.
The preparation before braising affects the quality of the dish. You need to blanch the pork to remove the untoward ‘porky’ smell, apply some dark soy sauce to the surface to get a better appearance and pan-frying the skin side to create more aroma.
Let’s look at each of this one-by-one:
Blanching
Blanching helps to remove the unwanted smell of pork. First, bring a pot of water to a boil. The volume of water should be sufficient to submerge the whole piece of pork belly. Blanch the pork belly until you can use the tip of the chopstick to pierce into the flesh through the skin. It may take about ten minutes, depends on the size of the pork belly. Remove and drain.
Puncture the skin
Puncture the skin with a metal skewer or the tip of the chef knife. This step creates plenty of small holes in the skin. When you deep fried the pork later, the skin may tend to crack due to the high heat. Pricking small holes can prevent the skin from cracking.

Apply dark soy sauce
After pricking holes, apply some dark soy sauce on the skin. The dark soy sauce help to add color to the surface for better appearance while adding flavor. Set it aside for thirty minutes or until the pork is dry before deep-frying it.
Pan-fried the skin
Pan-fried the skin until it turns crispy and aromatic. Heat up about half an inch of oil in a flat pan or wok over medium heat. Gently lower down the pork belly, skin side down into the oil and pan-fried the skin until crispy and golden brown. Move the pork slightly from time to time to prevent it from sticking to the wok. You may cover the wok if the oil splatter too much.
Submerge in water
Some recipes will include this step. Remove the pork from the oil. Submerge it in cold water until the skin puffs up slightly. Remove the pork from the water. This method will make the skin soft and springy. However, I do NOT include this step in this recipe. Why? It is because the pork will braise for 2 hours. The skin will become soft and springy naturally.
Now you have completed the most critical step in making good Chinese stew pork. I feel that this is the most crucial step of the whole cooking process. This step will set apart the mediocre stew pork with taro from the excellent one.
Place the skin side on the chopping board. Cut the pork belly into 5mm thick slices. Set aside.
Marinate the pork
Marinate the pork with a set of seasoning ingredients will enhance the flavor tremendously. I have just made a batch of pork belly with taro by following a recipe that does not require marination. Although it is an easy pork belly with taro recipe I find that it does not deliver the desired flavor as intense as the marinated version.
You will notice that there are three sets of seasonings in the recipe. The first set is for marinating the pork, and the other two are for the taro and the sauce. You can marinate the pork overnight, but at least for an hour when you are running out of time.
A word about preserved red beancurd
Preserved red beancurd (南乳, or fermented bean curd) is made with bean curd fermented in a mix of rice wine, vinegar, fermented red yeast rice among other seasonings.
It is the key ingredient that contributes to the intense flavor of this dish. The fermented beancurd imparts a deep red hue and the distinct savory flavor to the meat.
When you purchase the preserved beancurd, choose the one that is red (南乳), not the one that is white (腐乳). The flavor is not the same.


Step two- Prepare the taro for stewing.
Taro is referred to the potato of the tropics. Choose the bigger taro so that you can cut it into pieces of the same size with the pork slices.
The best taro for stewing is those with higher content of starch. So how to choose taros that is more starchy? Here are some characteristics of the more starchy taros:
- Lighter taro is more starchy (which is good for this recipe). The heavier one has more water content and less starchy.
- If you cut open the skin slightly near to the root, (or use your fingernail), you will notice a little thick, white liquid like cream coming out. This liquid will turn into white powder when it is dry. Taro with a higher content of starch should have this property.
After you get the right taro, prepare it by following the steps below:
- Peel off the skin of the taro with a paring knife or vegetable peeler. Some people may find that taro can irritate the skin, due to the presence of the oxalic crystals. (Luckily I am not allergic to it.) Put on your glove before handling the taro if you are allergic to it. Cut the peeled taro into two, and then quarter and into 5mm thick slices.
- Submerge it in water to prevent discoloration if you do not intend to use it immediately.
- Heat up about an inch of vegetable oil in a frying pan over medium heat. Pan-fried the taro slices until both sides are brown and crispy. It may take a few minutes to get it to change color slightly. Remove and drain away from the oil on paper towels.
- Marinate the taro with the fermented red beancurd, some Shaoxing wine, and fine spice powder. Be gentle when you mix the marinade with the taro slices. They are quite fragile!
Deep-frying adds more flavor to the taro. It also made the taro slices firmer and prevented them from breaking during handling and stewing.
Step three- prepare the sauce.
You can start to prepare the sauce while soaking the pork belly in the water.
The flavor of this savory sauce is entirely different from other braising liquid. The hero in the sauce is the preserved red beancurd. This fermented beancurd has an intensely savory flavor, very much like a fermented cheese. You only required a small amount for a large pot of meat. This ingredient is very common among the Chinese, which should be available in most of the Asian grocery shop,
Here are the steps:
- Mince the garlic and shallots. Saute in vegetable oil over low heat until aromatic. Be careful not to burn the garlic as it will taste bitter.
- Add the preserved red beancurd to the wok. Mix it with the garlic and shallots to form a paste. Then add 400ml of water and turn it into a sauce.
- Add the five spice powder, chicken stock, wine, star anise, light soy sauce, salt and sugar into the wok. Bring it a boil and let it simmer for five minutes to reduce a quarter of the volume. If you do not have chicken stock, just use plain water although the flavor is less intense.
- You may want to add a half teaspoon of cornflour to thicken the sauce or simmer a little longer until it slightly thickens.
Braising or steaming?
Since the pork and taro are steam in the braising liquid, it is both! You can find the recipe 芋头扣肉 by typing both versions in the browser, but braised pork belly and taro is definitely the more popular English name.
Step four- Braised the pork belly and enjoy
The final step is to braised the pork and taro slices with the sauce.
It may take a while, but I am sure it is worth to wait when the aroma from the lengthy braising drifting in from the kitchen.
Here are the steps:
- Arrange the pork and taro slices alternate one with another in a standing position, with the pork skin side down in a large bowl. Choose two of the best looking piece of pork at the beginning and the end of the arrangement, as this will be shown clearly after inverting onto a plate.
- Make sure you pack the taro and pork slices upright like a pack of cards and tightly in the bowl so that they will stick together when it is served up-ended. Pour the sauce over the pork and taro. The sauce will seep through the layers eventually.
- Braised the pork on a steamer over medium heat, lid on for 2 hours, or until the pork and taro slices are soft.
- Pour the excess braising liquid into a pan carefully so the pork and taro slices are firmly sitting in the bowl. Heat up the braising liquid and reduce it to a thick sauce.
- Invert the bowl onto a plate. Remove the bowl so that the pork is serve up-ended. Pour the thicken braising liquid on it. Sprinkle some chopped scallions for garnishing. Serve along with simple Asian greens such as bok choy or Chinese lettuce.
The Chinese Braised Pork and Taro Recipe
Braised pork belly with taro recipe
This is the traditional Hakka dish, which has an intense flavor. Best to serve with steamed rice.
Ingredients
Ingredients A- for the pork
- 450 g pork belly
- 10 g red preserved beancurd
- 1 tablespoons Shaoxing wine
- 1.5 tablespoons oyster sauce
- 1/4 teaspoon Chinese five-spice powder
- 1/4 teaspoon ground white pepper
- dark soy sauce, , to brush the pork skin
Ingredients B- for the taro
- 450 g taro
- 10 g red preserved beancurd
- 1/4 teaspoon Chinese five-spice powder
- 1 tablespoon Shaoxing wine
Ingredients C- for the sauce
- 2 tablespoons vegetable oil
- 1 tablespoon garlic, , minced
- 2 tablespoons onion, , finely chopped
- 25 g cubes red preserved beancurd, , (1 cube is about 10g)
- 1 tablespoon Shaoxing wine
- 1 tablespoons sugar
- 1 star anise, , (about 6 star-points)
- 150 ml chicken stock, , or water if not available
Instructions
For the pork:
- Heat up two liters of water in a pot until boiling. Blanch the pork belly for ten minutes. Drain away the water puncture the skin to create small holes with a metal skewer or the tip of a pair of scissors.
- Remove the pork. Pat dry. Apply some dark soy sauce on the skin. Set aside for ten minutes to let it dry.
- Place it in a frying pan or wok and pan-fried with skin side down until the skin is crispy and golden brown. Transfer it to a pot of cold water and let it soak for two to four hours or until the skin puff up and soften.
- Remove. Cut the pork into 1/2 cm thick slices.
- Marinate with ingredients in A for 1 hour.
For the taro:
- Remove the skin. Cut the taro into two, then quartered it. Cut into 1/2 cm thick slices.
- Fried the taro slices until both sides become golden brown.
- Marinate with ingredients in B for 1 hour.
- For the sauce:
- Saute the onions and garlic. Add the leftover marinade for the pork and the remaining ingredients in C.
For braising
- Arrange the pork and taro slices alternate one with another in a large, deep bowl. Place any excess taro on top.
- Pour the sauce into the bowl until it reaches 80% full. Cover with aluminum foil.
- Steam the pork and taro over boiling water with lid-on for 2 hours.
- Revert the bowl of pork and taro on a large plate.
- Garnish with green vegetables. Serve.
Notes
You can are a large batch of Stew pork with taro as it freezes very well.
Recommended Products
As an Amazon Associate and member of other affiliate programs, I earn from qualifying purchases.
-

 MICHELANGELO Nonstick Frying Pan Stone with Ultra Nonstick Granite Coating, 10 Inch Frying Pan with Lid, Nonstick Skillet Pfoa Free, Non toxic Rock Pan, Induction Compatible -10 inch
 -

 Farberware 70043 Stack 'N' Steam 3-Qt. Covered Saucepot Insert Stainless Steel Steamer Set, 3-Quart
 -

 Imarku Pro Kitchen 8 Inch Chef's Knife High Carbon Stainless Steel Sharp Gyutou Knives Ergonomic Equipment
 -

 Kitchen Basics No Salt Chicken Stock, 8.25 oz (Pack of 12)
Nutrition Information:
Yield:
4Serving Size:
4 servingsAmount Per Serving: Calories: 635Total Fat: 34gSaturated Fat: 10gTrans Fat: 0gUnsaturated Fat: 22gCholesterol: 102mgSodium: 713mgCarbohydrates: 46gFiber: 6gSugar: 5gProtein: 32g
This data was provided and calculated by Nutritionix on 5/24/2019
Emily
Wednesday 6th of March 2024
Hi, I loved the way you layout your explanation of the recipe. Very easy to follow. My mum used to make this dish when I was young. I seem to remember she used the pressure cooker instead or braising / steaming. Do you think I can try that?
KP Kwan
Sunday 10th of March 2024
Since the cooking involves frying the pork and then steaming it, it is a different method than pressure cooking. I should stick to the traditional method for the time being.
Rebecca Tuazon
Tuesday 29th of December 2020
I like the way you present this recipe. Very different from the others. Very easy to follow. Thanks for sharing it.
KP Kwan
Wednesday 30th of December 2020
You are welcome.
Jackie chin
Sunday 27th of September 2020
Best pork & yam recipe I have ever seen... my mother in law used to make it for us all the time before she passed away.. it was my favorite and I never got the recipe from her.. I tried to make it a couple of times from watching her but I never seem to get it exactly... your explanation is very thorough and I am going to get the ingredients to try and make it again... thanks.. thanks... thanks..
KP Kwan
Monday 28th of September 2020
Hi Jackie, You are welcome, and I hope you will enjoy the pork. KP Kwan
Janet Sim
Thursday 3rd of October 2019
I m trying this today for the first time. I noticed an error in the recipe?
For the pork 5. Marinate with ingredients in B for 1 hour. Shouldn't it be A? (not B?)
For the taro 3. Marinate with ingredients in C for 1 hour. Shouldn't it be B ? ( not C?)
Thank you
KP Kwan
Friday 4th of October 2019
Hi Janet, Thank you for pointing out the error. I have corrected the mistake in the recipe. I hope it did not confuse you. Best regards, KP Kwan
Lei
Saturday 5th of May 2018
Sorry, do you crush the star anise into a powder or little pieces.