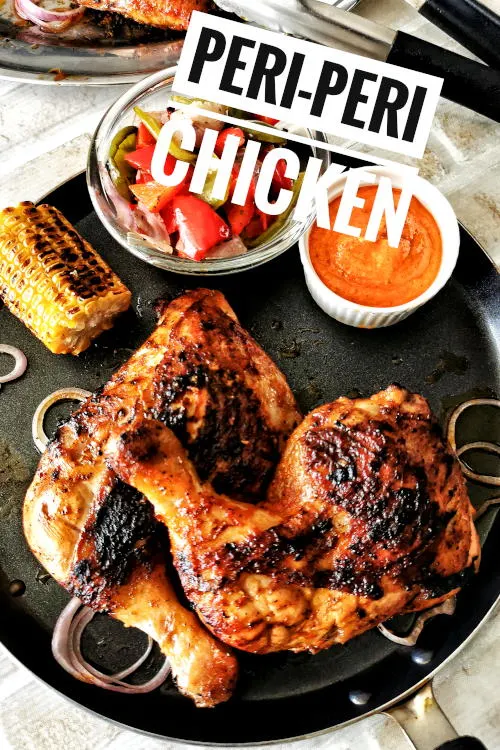
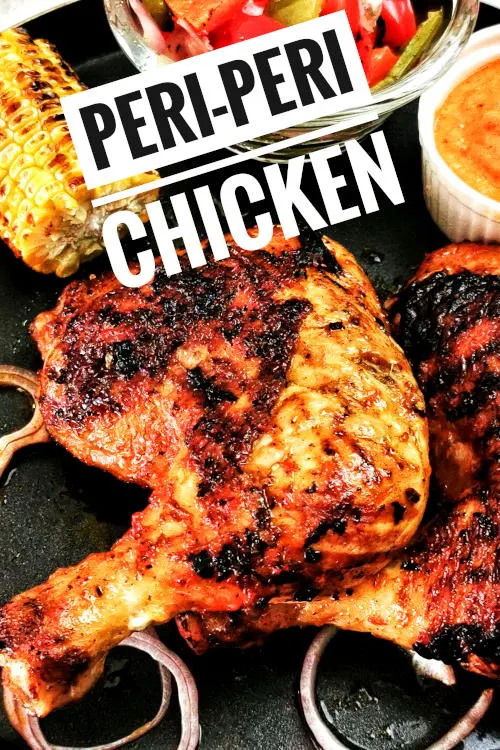
I have been a loyal customer of Nando’s peri-peri chicken and have always wanted to create a homemade version of Nando’s chicken recipe. And finally, I have done it!
All you need are chilies and some common ingredients in the kitchen pantry. Since I live in an apartment, I use the grill pan and oven instead of an open-fire grill. The result just blew me away!
Let’s get into the details.

❓What is peri-peri chicken?
The word peri-peri is from Swahili, a language used by the locals in East Africa. It means pepper or spicy chili. The sauce was of Portuguese origin, but the Portuguese settlers had made it widely popular in African countries like Mozambique and South Africa.
This Portuguese BBQ peri-peri chicken (also spelled as piri-piri chicken) has become a famous spicy food since the South African food chain Nando’s Chicken opened up stores worldwide. The chicken is marinated with peri-peri sauce, a chili sauce made with African bird’s eye chilies, vinegar, lemon juice, and spices. The spicy, tangy, and garlicky flavor has won over many gastronomers and garners a legion of fans.
Note: This post may contain affiliate links. Please read my privacy policy for more info. I may receive commissions for purchases made through links in this post. As an Amazon Associate, I earn from qualifying purchases.
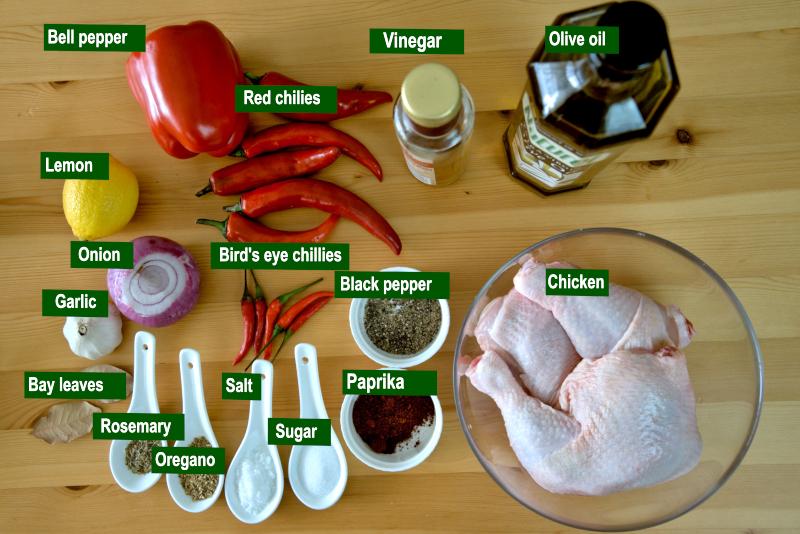
🛒Ingredients needed for peri-peri sauce (Nando’s sauce)
The peri-peri sauce is an integral part of Nando’s chicken recipe. It has a unique flavor that no other hot sauce comes close to. It is used as the peri-peri marinade for the chicken and the dipping sauce while serving. Here is the rundown of the main ingredients for peri-peri chicken.
- Chicken. I use chicken hindquarters (whole chicken legs), but the process is the same if you use the entire chicken. You may use chicken breasts, thighs, wings, or other chicken pieces.
- Chilies. The original recipes for peri-peri sauce are made with African bird’s eye chili. However, since this type of chili is unavailable where I live (Malaysia), I choose to use the local bird’s eye chilies, which are similar. Besides that, I also use the local large red chilies, which are less spicy than the bird’s eye chili. I also include the non-spicy red bell pepper. You may also want to try using cayenne pepper.
- Onion and garlic. The aromatics in the recipes are onion and garlic. Have a few rough cuts for the red onion, and bash the garlic cloves. Both of them will give some texture to the sauce besides their flavor. The sauce will become too diluted without them.
- Vinegar. The acidity of the peri-peri sauce comes from wine vinegar and lemon. I use wine vinegar, but you can substitute it with other white vinegar.
- Lemon. As for the lemon, you need the lemon juice for the acidity and the lemon zest for the flavor. It is easier to zest the lemon before cutting it in half. Be careful not to use the white part when zesting the lemon, as it is bitter. The yellow part of the peel holds the essential oil filled with lemon flavor, which is what you want. On the other hand, lemon juice has an acidic, tart taste that is different from the zest. Therefore, it is best to use both in preparing the peri-peri sauce.
- Other spices. Oregano is the main herb used in peri-peri sauce. Paprika is also required to provide the flavor. My recipe includes oregano, rosemary, black pepper, salt, and sugar. Sometimes, I use white pepper, which makes no significant difference.

👉 How to make Nando’s peri-peri chicken
I break down the steps into sections to make them clear and easy to follow.
a. Make the peri-peri sauce
1. Cut the onions into small chunks. Deseed the bell pepper and cut it into large pieces. Place them in a baking tray on the oven’s top rack to broil until they are partially charred. The goal is to introduce some charred flavor. Remove and let it cool.
2. Remove the stems and seeds of the large red chilies and bird’s eye chilies. Cut the chilies into two cm sections to lessen the workload of the food processor while blending them into a paste in the next step.
3. Place the chilies, onion, garlic, vinegar, part of the lemon juice, and other spices listed in the recipe into a blender or food processor. Blend for two minutes or until it turns into a smooth paste.
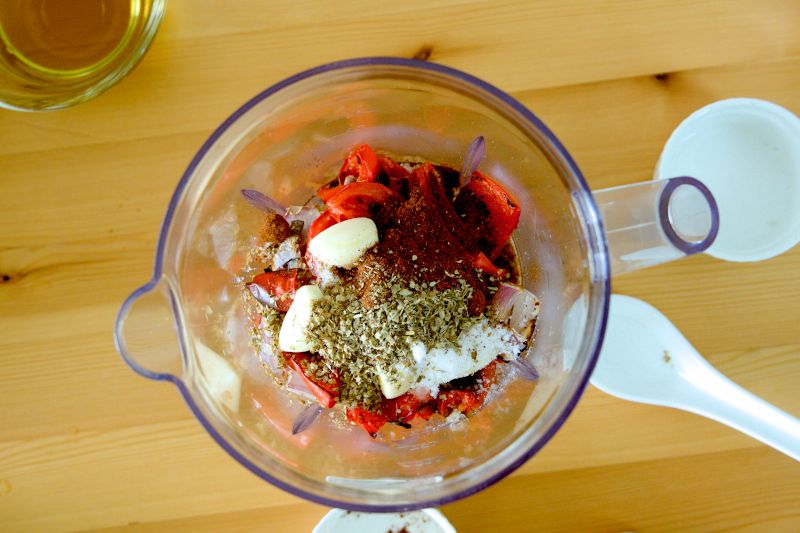
4. Transfer the chili paste to a small pot. Add the bay leaves.
5. Bring it to a boil and simmer over low heat for ten minutes to break down the ingredients. Please keep stirring to prevent it from sticking to the pot, especially in the final few minutes when the sauce has become thicker.


6. Discard the bay leaves. Transfer the cooked sauce back to the blender.
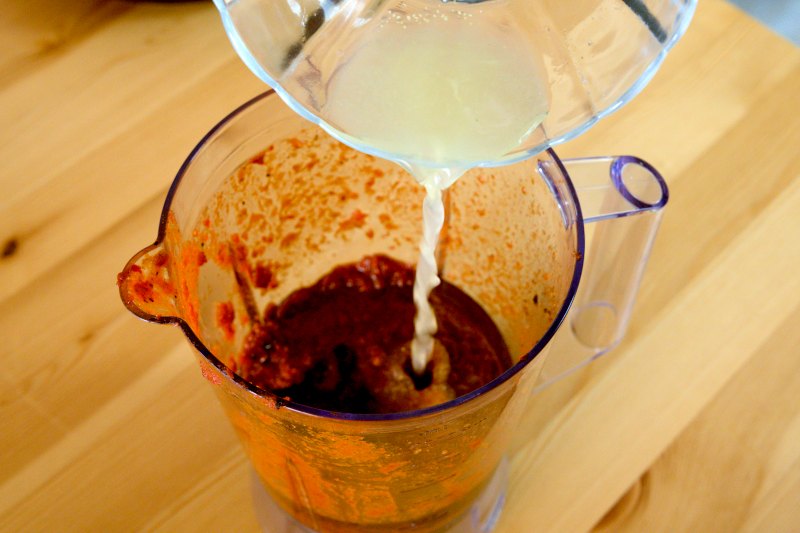
7. Add the remaining lemon juice, lemon zest, and olive oil. Blend for half a minute, and the peri-peri sauce is done.

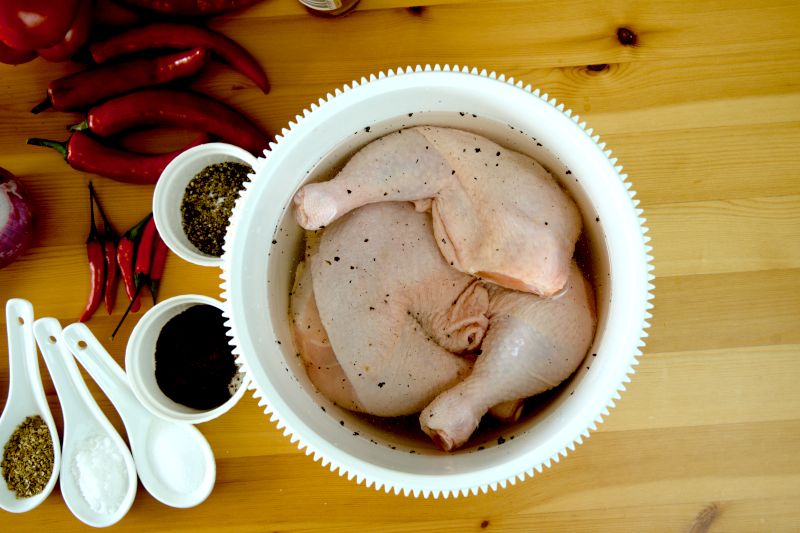
b. Brine the chicken
1. Clean the chicken hindquarters thoroughly.
2. Add 4 tbsp salt, 4 tbsp sugar, and 2 tsp crushed black pepper to a large container. Pour 1 cup of hot water into the container. Stir to dissolve the sugar and salt.
3. Add half of the tap water and some ice cubes to cool the water. Place the chicken into the water. Mix well.
4. Place something heavy (I use the lid of my pan) on the chicken so they always submerge in the brine. Transfer it to the refrigerator and let it sit for at least half a day or overnight.

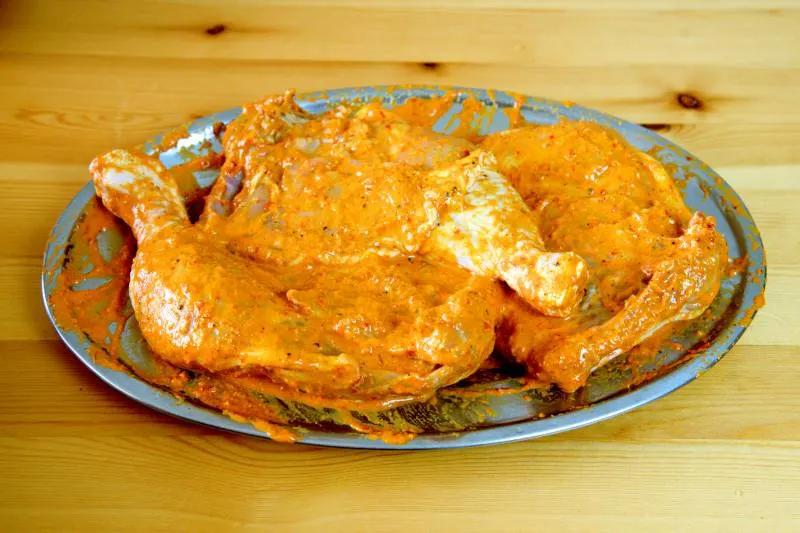
c. Marinate the chicken
1. Remove the chicken from the brine. Pat dry the chicken
2. Rub the chicken with a copious amount of peri peri marinade. You can add more than required as you will use the extra to apply onto the surface before roasting it in the oven.
3. Keep it in a ziploc bag (or freezer bag) and place it in the refrigerator to marinate it for half a day or overnight. Prolonged marination helps to yield tender chicken.

d. Grill, then roast the chicken
1. The final step of my Nando’s chicken recipe is to grill and roast the marinated chicken. However, setting up an outdoor grill is impossible since I live in a high-rise apartment. Therefore, I have to settle with a grill pan on the stovetop.
2. Heat some oil in the grill pan over medium to high heat. When the pan is hot, grill the chicken skin side down until it forms the charred marks. Then, turn to the other side and continue grilling.
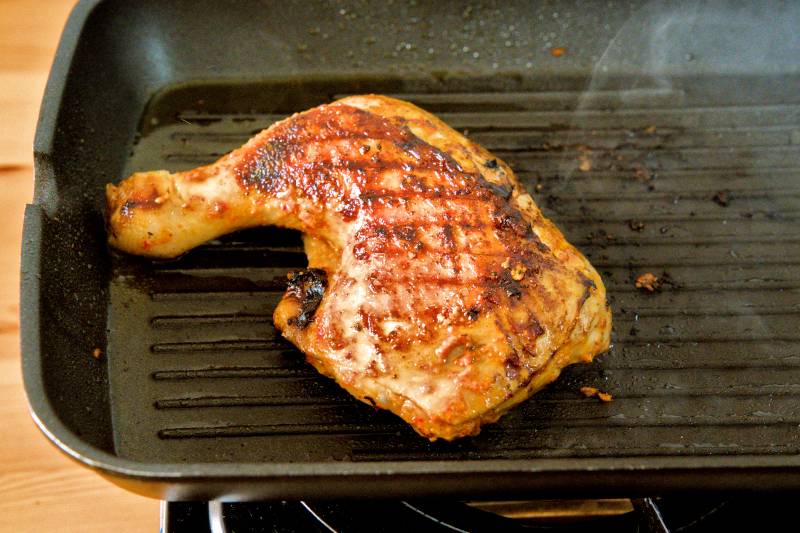

3. The grill pan behaves differently than the open-fire grill, as the side of the chicken will not brown effectively. To overcome this problem and get the best result, lift the chicken with tongs to char all sides of the chicken. Move the chicken from time to time to ensure it is grilled evenly.
4. Transfer the chicken to the oven rack. Brush the extra marinade abundantly on both sides of the chicken.


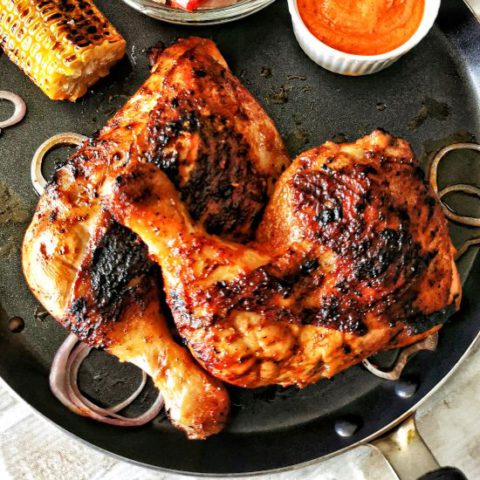
5. Place the chicken in the oven and roast at 150°C/300°F for about thirty minutes. The chicken is cooked when the internal temperature reaches 70°C/160°F. Remove and serve.


I have also made some grilled vegetables and oven-roasted corn as side dishes, which are my favorites when dining at Nando’s Restaurant.
Note: After grilling, the chicken is placed in the oven to ensure the inside is fully cooked. It is best to use a meat thermometer to check the temperature by inserting it into the thickest part of the chicken to monitor the internal temperature. The use of low temperatures will prevent the color of the skin from darkening during roasting.
💡Tips and notes for the best Nando’s peri-peri chicken
- The primary ingredient for peri-peri sauce (also spelled as piri-piri sauce) is chili, making it a spicy sauce. I use three types of chilies in this recipe. The combination is necessary because this chili has a different flavor and level of heat. You may want to remove as many seeds as possible if you can’t take the heat rather than reduce the chili. The more chili you use, the more flavor you will get.
- You may consider wearing a glove to avoid the burning feeling when you cut the chilies. You can also rub your hands with oil before handling the chili if you do not want to use the glove.
- Please adjust the spice level by changing the number of chilies in the recipe. Similarly, you can change the amount of lemon, herbs, and garlic to your preference. Nando has a variety of sauces with different levels of spiciness. The taste profile of this sauce is approximately the peri-peri sauce with moderate heat offered in the Nando restaurant in Malaysia.
- Brining the chicken is an optional step to enhance the flavor and ensure the meat’s juiciness. You may want to skip this step if you are short of time or looking for a simple way to prepare the peri-peri chicken. It may not make a huge difference, especially if you are using fresh chicken, but I think there will be a noticeable improvement for frozen chicken. If you think it is OK to speed up the work by sacrificing that slight extra juiciness, you can skip this step and move straight to marinate it. If so, please remember to season it with salt. You do not need to do this if you brine the chicken because there is sufficient salt.
- If you use the open fire to grill the chicken, the heat from the charcoal is sufficient to cook the chicken effectively. However, this is not the case when cooking it with a grill pan. There is a chance that the surface is already brown and charred, but the inside is still raw. Therefore, when the charred marks are formed, I remove the chicken from the grill pan and finish cooking it in the oven.

Verdict for my Nando’s chicken recipe
The taste of my homemade Nando’s copycat is almost identical to the original taste of Nando’s peri peri chicken, which is the reference for my homemade version.
However, if I want to be picky, I prefer my Nando’s chicken recipe because it is juicier (most likely because I brine the fresh chicken). As for the peri-peri sauce, Nando’s version tastes more acidic, and my homemade sauce has a more lemon flavor. Another plus point of the homemade sauce is that it is free from chili seeds.
The homemade version lacks the smoke flavor, which is expected. Although I tried to infuse some smoke flavor by heating a few charcoals until smoky, then covering them with the chicken during marinade, it did not introduce much smoke flavor to the chicken.
Lastly, I also want to point out that the flavor of Nando’s chicken in different regions may not be the same. For example, Nando’s restaurants in Malaysia offer a few peri-peri sauces with varying heat levels. Therefore, I used the medium heat peri-peri sauce as the benchmark while developing Nando’s chicken recipe.
🆒 How do you store and reheat the leftover peri-peri chicken?
If you have leftover Peri-Peri Chicken, please store it in an airtight container in the refrigerator. It can be kept for at least a day or two without any noticeable changes in taste. If you need to keep it longer, use a freezer-safe container and freeze it. I like to shred the leftover chicken into pieces and mix it into my salad for serving.


📜 A related recipe to this Nando’s chicken recipe
If you like fast food style chicken like Nando’s of KFC, you will love the Malaysian-style fried chicken (ayam goreng) with a deep savory and spicy flavor. It is crispy on the outside, with the flavor of the spices down to the bone. So, you may view it as a spicy version of KFC.

How to prepare Nando’s peri-peri chicken
I have been a loyal customer of Nando’s peri-peri chicken and always want to create a homemade version of the Nando’s chicken recipe. And finally, I have done it!
I want to share how I make it in this article, and all you need are some chilies plus some common ingredients in the kitchen pantry.
Let’s get into the details.
Ingredients
Ingredients A (for the sauce)
- 1 red bell pepper (broil)
- 1 medium-sized onion (roughly chopped) (broil)
- 5 bird's eye chilies (roughly chopped)*
- 5 large red chilies (roughly chopped)*
- 8 cloves garlic
- 80ml red wine vinegar
- 30ml lemon juice
- 2 tsp dried oregano
- 1 tsp dried rosemary
- 2 tsp paprika
- 1.5 tsp salt
- 1 tsp sugar
- 1 tsp ground black pepper
Ingredients B (for the sauce)
- 30ml lemon juice
- Zest of one lemon
- 2 bay leaves
- 80ml olive oil
Ingredients C (chicken brine)
- 4 tbsp salt
- 4 tbsp sugar
- 1 tsp crushed black pepper
- 1 liter cold water
- 1/2 liter hot water
- Some ice cubes
Ingredients D (others)
- 3 chicken hindquarters
- Vegetables to grill the chicken
Instructions
Make the peri-peri sauce
- In a food processor, add ingredients A. Blend until the mixture is smooth with no large chunks remaining.
- Pour the puree into a saucepan and simmer for 10 minutes. Add the bay leaves. Stir occasionally to avoid it from sticking and overburn.
- After 10 minutes, remove the bay leaves.
- Return the sauce to the food processor.
- Add the remaining lemon juice, lemon zest, and olive oil, and blend until smooth.
Brine the chicken
- Dissolve the salt and sugar in hot water in a large container. Add the black pepper, cold water, and some ice to cool it.
- Place the chicken in the brine and let it sit for half a day or overnight.
Marinate the chicken
- Pat dry the chicken.
- Marinate the chicken with the peri-peri sauce for half a day or overnight.
Cook the chicken
- Remove and place it on a grill pan. Sear on both sides until the charred marks are formed on the surface.
- Place the chicken on an oven rack, and apply more peri-peri sauce on both sides.
- Roast in the preheated oven at 150°C/300°F for 30 minutes or until the internal temperature reaches 70°C/160°F.
- Serve.
Recommended Products
As an Amazon Associate and member of other affiliate programs, I earn from qualifying purchases.
-
 Amazon Brand - Happy Belly Mediterranean Oregano, 0.65 Ounce
 -
 Cooks Standard 02520 Quart Classic Stainless Steel Stockpot with Lid, 12-QT, Silver
 -
 Pride of Szeged Sweet Paprika Powder, Hungarian Style Seasoning Spice, Deep Red, 4 oz. Tin, 1-Count
 -
 Pompeian Gourmet Organic Red Wine Vinegar, Unfiltered & Unpasteurized, Perfect for Marinades, Salad Dressings, 16 FL. OZ., Pack of 6
Nutrition Information:
Yield: 3 Serving Size: 1Amount Per Serving: Calories: 742Total Fat: 44gSaturated Fat: 9gTrans Fat: 0gUnsaturated Fat: 32gCholesterol: 133mgSodium: 10618mgCarbohydrates: 51gFiber: 7gSugar: 31gProtein: 40g
This data was provided and calculated by Nutritionix on 10/3/2021
Ange
Tuesday 11th of November 2025
This recipe is confusing. Step 2. Of the peri-peri sauce recipe says to add ingredients B, then step 4. says to add the olive oil, lemon juice and zest (which are the B ingredients). Terrific recipe though ❤️
KP Kwan
Tuesday 11th of November 2025
Thank you for your comment. I have rewritten the confusing instruction and hope it is now easy to understand.
Malika
Monday 8th of September 2025
Absolutely divine piri-piri sauce! Thank you so much. I am in the middle of the chicken marinating in this divine peri-peri sauce, and already, I can already sense how wonderful it will turn out. I am adding a few more ground fresh garlic before grilling-roasting it - the garlic we get here is a bit mild.
Sabeya Abdullatif
Wednesday 11th of September 2024
Hi, can you substitute red wine vinegar to any vinegar.
KP Kwan
Friday 13th of September 2024
Yes, I used white vinegar once, but the difference is unnoticeable.
Bridie
Friday 4th of November 2022
Hello! I am trying out the recipe and wanted to clarify Step two of making peri peri sauce - do you simmer for ten minutes with just the bay leaf, then add oil/lemon? Or do you add oil/lemon at the same time you add the bay leaf?
KP Kwan
Saturday 5th of November 2022
I simmer the bay leaf with all the blended ingredients for ten minutes. You can check out the video, which is helpful.
KP Kwan
Sunday 3rd of October 2021
Hi, this is KP Kwan. I am happy to see you in this comment area, as you have read through my recipe. I am glad to reply to any questions and comments as soon as possible.