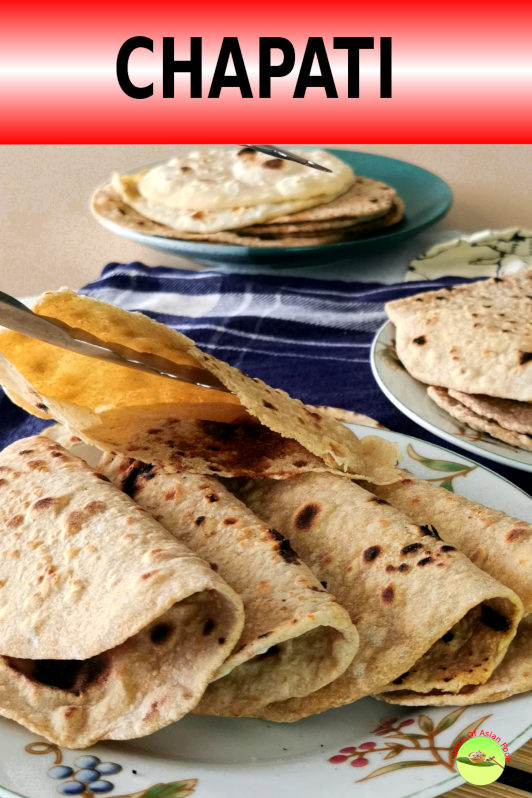
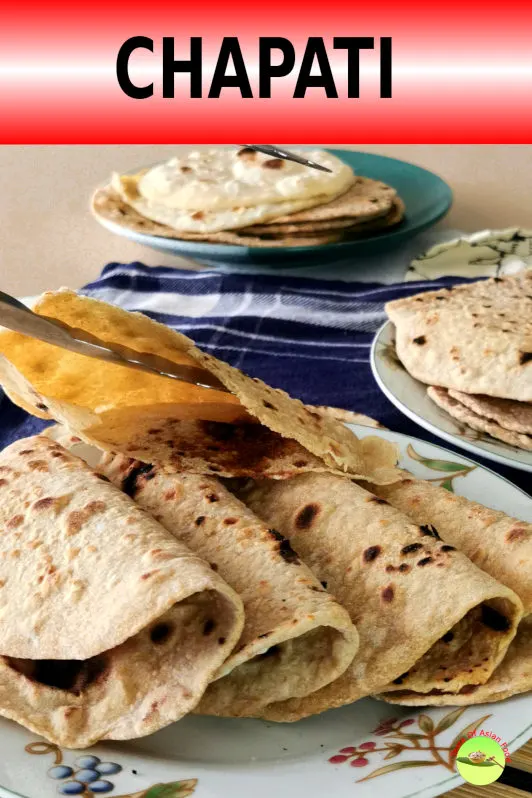
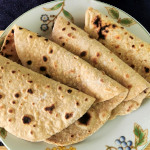
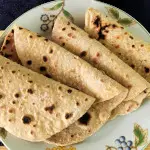
This authentic chapati recipe yields one of the best Indian flatbreads I have tried.
What is chapati?
Chapati is a quintessential staple flatbread that originated in India. It has a distinct flavor and aroma due to the whole wheat flour called atta. It is often served with spiced dishes like curry and dhal.
This chapati recipe includes a detailed explanation of how to cook it perfectly. There is also a collection of tricks and tips with a video demonstration.
Cooking chapati is pleasurable, especially watching it expand and puff on the tawa.
Let’s get into the details right away.
Note: Chapati in English is also translated as chapatti, chappati, chapathi, or chappathi. It is an unleavened Indian flatbread and is also called roti, safati, shabaati, phulka at different places.
Note: This post may contain affiliate links. Please read my privacy policy for more info. I may receive commissions for purchases made through links in this post. As an Amazon Associate, I earn from qualifying purchases.
Step-by-step instructions on how to prepare homemade chapati
This soft chapati recipe involves only three steps. You need to climb over a small learning curve, but it is relatively easy once you have mastered it.
Note: This chapati recipe comes with a video demonstration. Please watch the video, especially the kneading and cooking steps.
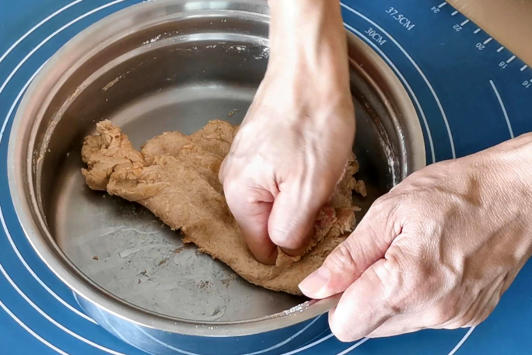
1. Knead the chapati dough
- Measure the amount of the atta flour, vegetable oil, and salt in a large bowl. Some chapati recipes use only water and atta flour, nothing else!
- The amount of water required depends on the type of flour used. It should use just enough water to avoid getting too wet and sticky. You can reserve a teaspoon of water for each 100g of flour and add it to the dough while kneading if it is too dry. Once you have fixed the formula, you can add the exact amount without hesitation. This chapati recipe uses 75ml of water for 100g of atta flour.
- Combine all the ingredients, then knead it until it picks up all the flour sticking to the mixing bowl.
- Continue kneading until it looks like plasticine; you can leave an impression on it with your finger.
- The easiest way is to knead it by pressing the dough with the knuckles and folding it to half after flattening it.
- The kneading process takes about five minutes for a small dough made with 100g of flour. It is done when you can make a clear indented mark on the dough’s surface with your fingers.
- You can adjust the dough’s softness during kneading by adding more water or flour if necessary.

Divide the dough into portions
- The dough I make is between 40g to 45g each, making chapati 6 to 7 inches in diameter. You can divide the ball of dough into equal pieces first or after resting for twenty minutes, which will not affect the outcome.
- Apply cooking oil on the top of the dough to prevent it from drying. Cover it with a damp cloth and let it relax for fifteen to twenty minutes.
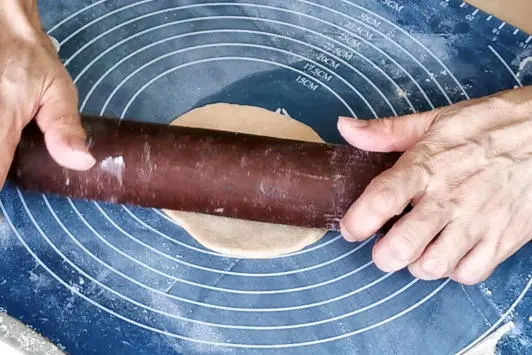
2. The best way to roll the chapati dough
We must roll the dough to become an attractive circle and puff up perfectly during cooking. There is no fixed way to do it, but the following method is one of the best ways to keep it close to a circle while rolling. I must admit that I am not making chapati as regularly as others who are experts in creating the perfect shape chapati. I aim to clearly explain that anyone, including the first-timer, can make it with minimum practice and testing. (Please watch the embedded video for the demonstration.)
Here are the steps:
- Flour the flat surface heavily and brush off the excess with your hand or the pastry cutter. This step prevents the chapati from sticking on the surface and the rolling pin while rolling out. A pastry mat and a chopping board made with wood is the good working surfaces for this purpose.
- The chapati dough is soft and stretchable after resting. Roll each dough into a smooth ball between two palms, then flatten with your palm.
- Dip the dough into some flour and shake off the excess.
- Roll out the dough with the rolling pin by applying different pressure to both hands. I roll out the dough with less pressure on my left compared to my right hand. My left hand also traveled a slightly shorter distance than my right hand. As a result of this motion, the dough rotates at a small angle while making each forward stroke.
- Since I roll the dough with only forward strokes, it rotates while rolling out, forming a round-shaped thin dough with a smooth edge. Please watch the video in this article at minute xxx for the action.
- However, if you feel this method is too complicated, you can use any method if it forms a circle of even thickness.
Note: The chapati dough I use is 45g each, and it should roll out to become 15 cm/6 inches in diameter.

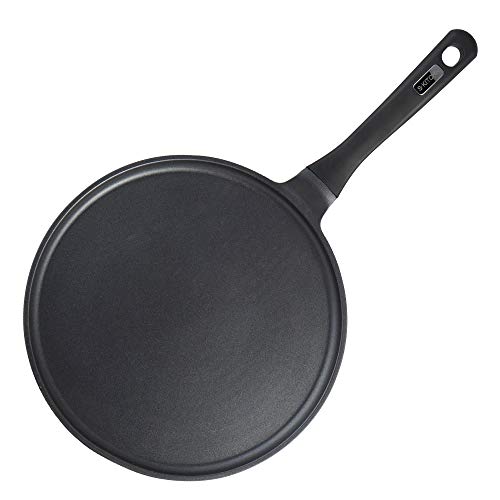
3. Cook the chapati on the tawa
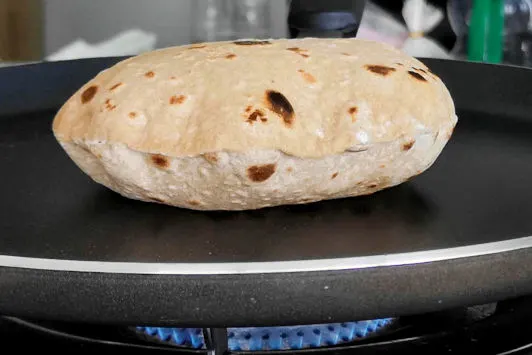
Cooking the chapati is easier than rolling the dough, but there are a few points to note to ensure the chapati puffs up like an air pillow on the tawa. (That is the most spectacular and fun part of playing with food in the kitchen.)
In the following section, I tested to determine the factor affecting the chapati’s puffing.
Meanwhile, let me explain the entire process in detail.
- Set the stove to medium heat
- Using the tawa (a disc-shaped frying pan) or a cast-iron skillet. It is essential to make sure the surface of the tawa is sufficiently hot before putting the chapati on it, or else the chapati will not puff up.
- A simple way to check whether it is sufficiently hot is to splash a few drops of water onto the tawa. The temperature is right if they sizzle and evaporate quickly. Another way is to place your palm an inch above the surface. It is ready if you feel the heat’s intensity is too strong to keep your palm there for over a second.
- Place the chapati on the tawa, and do not disturb it. After half a minute over a high flame, some small bubbles will pop on the surface, and the color will darken slightly. When some larger bubbles appear, it indicates that the bottom of the chapati has cooked. Now you can turn it over to the other side and wait for another half a minute.
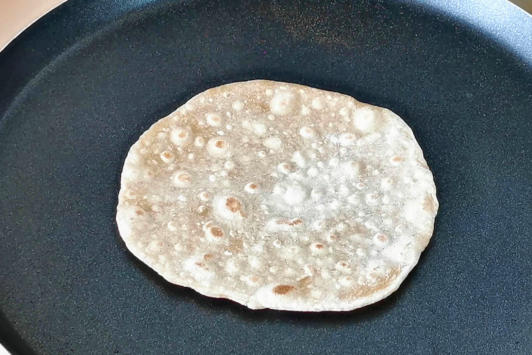
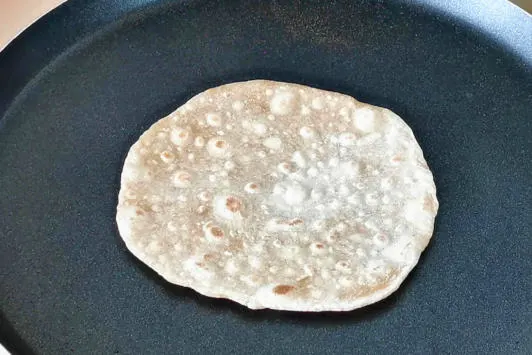
- Lift the chapati with a spatula to check the bottom side’s doneness. When some brown spots start forming on the first side, flip it over again so the side with the brown spots is on top.
- Now that’s when the magic happens. Since both sides have been cooked by now, the hot air within the chapati will expand, separating both sides and puffing up the chapati like an air pillow!
- You need to move the ‘pillow’ swiftly, either flip it over or tap to deflate it to prevent the chapati’s contact point with the tawa from burning due to high heat.
- Flip the chapati a few times until you get the desired color, and remove it from the hot tawa.
- Apply a light coating of ghee on the top side, especially at the chapati’s edge, to prevent it from drying out.

Six useful tips and tricks – How to make better chapati
This chapati recipe has only four ingredients, but it can be tricky to perfect it if you are unfamiliar with the cooking process. Here is a list of tricks and tips I learned while experimenting with different chapati recipes.
1. Do you need to use oil and salt to make chapati?
Including oil in the recipe is unnecessary if you intend to eat it immediately. However, if you eat it the next day or plan to freeze some of them, it is better to add a little oil. Chapathi, made with some oil, can be frozen for up to three months and is still soft.
Some chapati recipes do not include salt because it is usually eaten with curries with a strong flavor.
2. What is Atta flour?
Atta flour is an Indian wheat flour ground with a stone mill called chakki. Chakki is a pair of stones in which one is stationary and the other is rotating. The milling process generates a substantial amount of heat, which causes more starch damage than the roller milling method. It breaks the starch and releases added flavor while cooking at high heat, such as making chapati on the tawa. That is why chapati made with atta flour is better than other plain flour.
Atta flour contains about 12% protein, which forms gluten during kneading and makes the dough stretchable. This property makes it easy to roll the dough ball into thin pieces.
Here is an article I recommend if you want to know more about atta flour.


3. What types of flour are suitable besides atta flour to make chapati?
Atta flour is hard wheat flour (flour with high protein content) customarily used to make chapati. It is widely used to make chapati and is called chapati flour. However, you can also use half wheat flour and half of the regular flour.
Atta flour has a protein content of 12% and, therefore, can form gluten during kneading, providing the chapati’s strength to puff up during heating and the elasticity required to roll out to a thin sheet.
I conducted tests to determine the difference among chapatis made with various flour combinations. The result shows that atta flour produces the best flavor and texture. Please refer to the following section for the details.
4. Is the puffing of chapati crucial for making a good chapati?
Watching the chapati puffing up will make you drool.
Making puffy chapati is not merely for showmanship but also crucial to obtain a soft texture. Chapati that does not puff up during cooking is hard and dense.
5. What is the best way to roll out the chapati?
You may use the method I mentioned in the previous section or other ways recommended in other chapati recipes. Gliding the floured rolling pin forward is crucial by following its circumference regardless of the method. The path of each stroke is a curve, not a straight line.
The bent stroke will push the dough to turn at a small angle. Therefore, you do not need to manually turn the dough after each stroke. However, it only works if the work surface is floured so the dough can glide.
6. Is the chapati thinner the better?
Not necessarily. The next section’s test shows that the chapati will not puff up if it is too thin.
On the contrary, it has no problem puffing up if it is thicker than usual.
A simple test on different chapatis formula
While writing this article, I carried out a series of tests with different types of chapati recipes. Below is a summary of the results.
- (A) Half Atta flour with half bread flour. The chapati has a perfect texture but less flavor than chapati made with atta flour alone.
- (B) Half Atta flour with half all-purpose flour. The flavor and texture are very similar to A.
- (C) Wholemeal flour only. The taste is like chewing roughage. It is difficult to roll out, sticky, and does not puff up. It is a disastrous option.
- (D) Half wholemeal flour and half bread flour. The chapati does not puff up. The taste is closer to atta flour alone but lacks aroma. I think there is too much wholemeal flour that prevents it from puffing up.
- (E) 1/4 Wholemeal flour and 3/4 bread flour. This is the best chapati recipe alternative to atta flour alone. The chapati puffs up, the texture is soft, and it is very close, although it still lacks the signature aroma of atta flour
- (F) All-purpose flour alone. The color is lighter, and the texture is soft but has little flavor.
- (G) Bread flour alone. It is very similar to F, except the chapati is very chewy.
- (H) Thick versus extremely thin dough. The result shows that chapati with very thin dough cannot puff properly. On the contrary, the much thicker than normal has no problem puffing up correctly.
What is best to serve with chapati?
Chapati is best to serve with any spiced dishes. You can refer to the chicken curry and vegetable curry recipes on this blog. Other recipes like beef rendang, dhal, and chicken varuval are also great to be eaten with chapati. Also, serve best with aloo matar if you prefer a vegetarian version.
Storage
Chapati is best to be eaten fresh. If you need to make this Indian roti in advance, please keep it in an airtight container or a ziplock bag.
If you want to keep it longer, wrap the chapati with aluminum foil, then keep it in a ziplock bag for freezing to avoid ice from building up on the surface.
What is the difference? Chapati vs.roti, chapati vs.naan
Technically, chapati is one type of roti, but the name can be used interchangeably. Roti means unleavened round flatbread made with hard flour cooked on the tawa or griddle. Naan is a soft leavened flatbread usually cooked in the tandoor, the traditional clay oven.
Chapati recipe
This authentic chapati recipe yields one of the best Indian flatbread that I have tried.
This chapati recipe includes a detailed explanation of how to cook it perfectly. There is also a collection of tricks and tips and with a video demonstration.
Ingredients
- 200g of atta flour
- 1/4 tsp of salt
- 1 tsp of oil
- 150ml of warm water
Instructions
Knead the dough
- Combine all the ingredients. Continue kneading for 5 minutes until it is soft and pliable.
- Divide the dough into portions between 40g to 45g each.
- Apply some oil on the top of the dough. Cover it with a damp cloth and let it relax for fifteen to twenty minutes.
Roll the chapati dough
- Flour the work surface heavily.
- Flatten the dough with your palm. Dip the dough into some flour and shake off the excess.
- Roll out the dough with the rolling pin to a circle of 15cm/6inches in diameter. (Please refer to the video for demonstration).
Cook the chapati on the tawa
- Set the stove to medium-high to heat the tawa.
- Place the chapati on the tawa. When some larger bubbles appear, turn it over to the other side and cook for another half a minute.
- When some brown spots are starting to form at the bottom, flip it over again so that the side with the brown spots is on top.
- Tap to deflate the air to avoid the chapati’s contact point with the tawa from burning due to high heat.
- Flip the chapati a few times until you get the desired color and remove it from the tawa.
- Apply a light coating of ghee on the top side.
Recommended Products
As an Amazon Associate and member of other affiliate programs, I earn from qualifying purchases.

Nutrition Information:
Yield: 8 Serving Size: 1Amount Per Serving: Calories: 96Total Fat: 1gSaturated Fat: 0gTrans Fat: 0gUnsaturated Fat: 1gCholesterol: 0mgSodium: 74mgCarbohydrates: 19gFiber: 1gSugar: 0gProtein: 3g
This data was provided and calculated by Nutritionix on 10/24/2020
bmt services
Friday 14th of October 2022
Wholewheat flour works just fine; is healthier than other types mentioned; puffs up perfectly. It tastes great ; is also cheaper to purchase; One may add olive oil to change texture if desired. If you want to make better round roti use a 1 or 2 inch wooden dowel.
INDAI GATE FLOUR
Tuesday 22nd of June 2021
Thank you for such an informative article. It is very helpful and well put. If you desire to live a long and healthy life, consider adding whole-grain wheat to your diet. It has great nutritional values and great health effects. You can use it to prepare various kinds of food items.
Bilkies Karodia
Sunday 29th of November 2020
Hi do you use hot or cold water to make the chappatis we in South Africa use boiling hot water to make roti very much like chappatis I love the India Chappatis love to make some
KP Kwan
Monday 30th of November 2020
We use cold water here. I also heard of using hot water and would like to try it when I make it next time.
Dustin
Wednesday 4th of November 2020
I never thought I could make this cake until I read your method it was really great I made with my family.
KP Kwan
Wednesday 4th of November 2020
You are welcome. It is my pleasure to share.
Rose Rethual
Monday 26th of October 2020
Very well explained and in great detail. This would be of great help to amateurs. Thanks a million. God bless.